"Blessed are the children of scrapbookers, for they shall inherit the scrapbooks." ~Author Unknown

email us at lilbugger.ca@gmail.com


Friday, February 18, 2011

February Hello Thursday!

After finding my way through the whirlwind of January's Hello Thursday (10 cartridge releases and 6 cartridges retired), it was nice to see Provocraft tame it down a bit this month.  There are two Cricut® Imagine cartridge releases, Heirloom and Vintage Papers, and as you can see below, they have also released a cute cartridge exclusive to Creative Memories called Stork's Delivery.


My awesome Creative Memories consultant is Denyse McIntosh.  You can reach her by clicking on the Creative Memories link in my lower left sidebar.  Be sure to tell her I sent you!

Happy buggin'!

Wednesday, February 16, 2011

Batman The Brave and the Bold™

A couple of birthday cards made using the Batman: The Brave and the Bold™ Cricut® cartridge. The numbers are pop-dotted for dimension and the light blue background was embossed with the Cuttlebug using the Swiss Dots folder. The standing Batman was cut at 5" and I used the shadow feature, the smaller one was cut at 3" and the entire card measures 4" x 4".

Happy buggin'!

Tuesday, February 15, 2011

Kids and the Buggers

My son's Cub group raced their "Kub Kars" this week.  I wanted to include this post to show you that not only can kids use the Cricut machines, but they can also be used for so many things other than scrapbooking, cards, or paper and home crafts.  He's 8 and had no trouble using the Bitty Bugger with the Lil' Bugger to create some neat little embellishments for his Kar.  I helped him plan it out on the Bitty Bugger (Gypsy), and he welded the letters and sized it all on his own.  A quick cut, some stickles for effect and there you have it.  Incidentally, he came 1st in his heat and 3rd in the semi-finals.


"SPEED" was cut with the Cricut® Keystone cartridge at 1/2" and the letters were all welded together to cut one single image.  He took a gel pen and outlined the letters to add definition.  The flames were cut from the Disney™/Pixar Cars cartridge, both the Spare Parts and Spare Parts blackout features.  I believe they were cut at 2".

Happy buggin'!

Friday, February 11, 2011

Handbook Update

Don't forget to check out our handbook page!  Link here or click on 'Handbooks' at the top of this page.  We currently have 30 handbooks posted, with an explanation of how we use them for crops and storage. 


Happy buggin'!

Wednesday, February 9, 2011

Mini Bathroom Makeover

This is our new vanity...coudn't get much smaller, eh? We actually had to return the original "new" one that we bought. At 24", it was way too big :( The entire bathroom measures just under 4'x4'.

So Mr. Bugger installed this clean (yet boring-looking) vanity, to replace our slightly un-even, organizationally-challenged, dingy, pedestal sink (kicking myself for not taking 'before' photos of the sink - we were just so excited to have it gone!). Even though it's small, it offers up that little extra storage underneath which will allow for *most* of the clutter in this tiny bathroom to be hidden out of sight.

Also, if you look at this cabinet, it is made to open from the right. Well, we need it to open from the left because of the door and size of the bathroom. But there is no option to change it. It comes the way it comes, which of course we didn't notice until AFTER is was cut to fit the piping. The vanity comes with the hole already drilled for the knob. Because of that, to change the door to open the other way, the hole for the know is in the wrong spot. If you look closely in this photo...there it is waaaaaaaaay down at the bottom on the left. *sigh*

What to do, what to do??

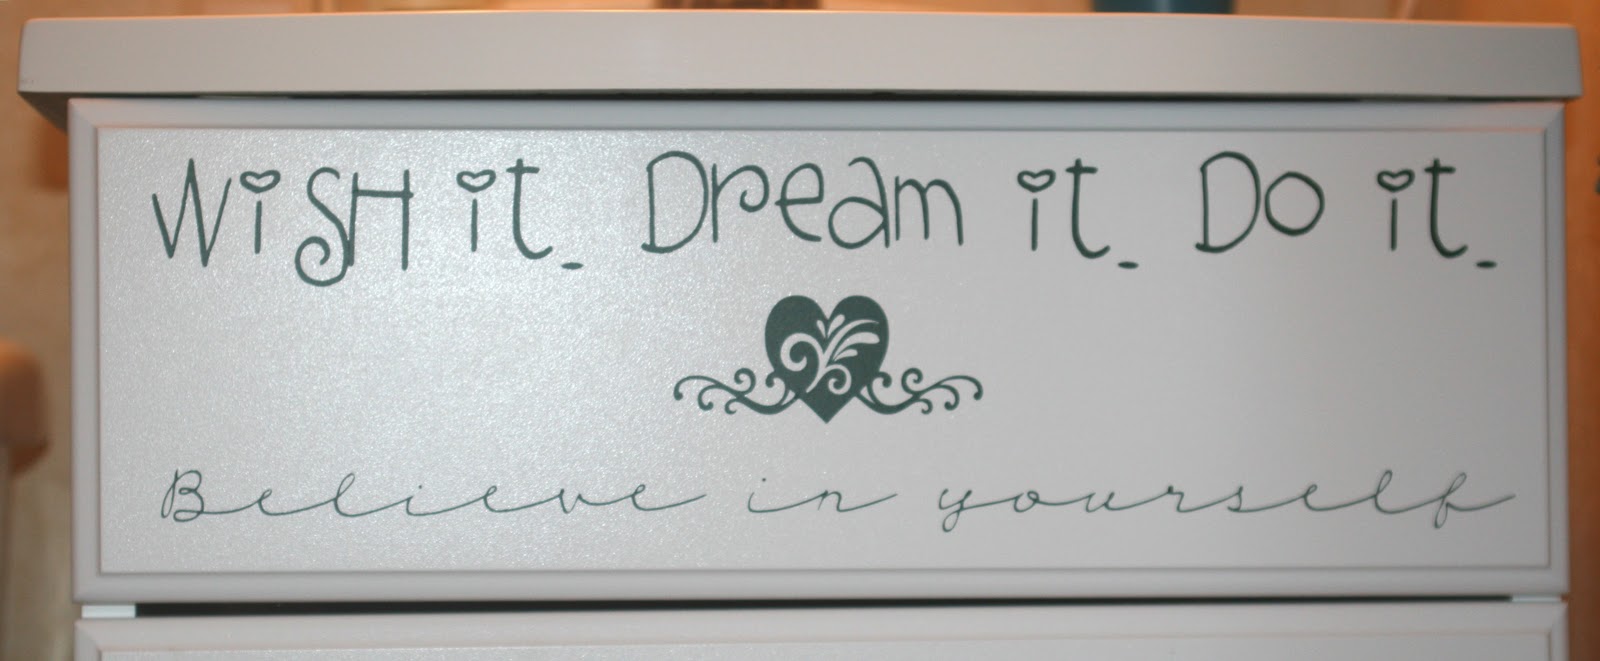
This was my solution.

I cut some vinyl on my Cricut to bling up my cabinet a bit. "Wish it. Dream it. Do it." is cut using SCAL and the EK Fairy font. "Believe in yourself" is cut using SCAL and the CK Cursive font. The two heart flourish images are from the Straight From the Nest Cricut cartridge (one cut at 1.5" and one cut at 2") and the two corner flourishes are from the French Manor Cricut Circle cartridge cut @ 2".

I filled the pre-drilled hole with hot glue, just even to the surface, lightly sanded the top with the end of my nail file and placed the flourish image right over the hole.

Not an entire bathroom make-over, but definitely enough oomphf to get us by for awhile!

Happy buggin'!


Everyday Paper Dolls Policeman Birthday

I made this cute little card for a police officer who was turning, you guessed it...50!  I used the policeman image from the Everyday Paper Dolls Cricut cartridge.  He was cut at 5.5".  I cut the badge on his hat and the handcuffs out of metallic cardstock, and he was accented with white and black gel pens. The "50" was cut at 1", from the Cricut Keystone cartridge.

Happy buggin'!

Tuesday, February 8, 2011

Happy Birthday Princess!


A set of birthday invitations made for a very special little girl. Princess Aurora is cut from the Happily Ever After (Disney™) cartridge at 4.25". Her crown has gold stickles and the shoulders of her dress has champagne stickles. The princess and the '6' are pop-dotted for dimension.  The light pink background of the card is embossed with the Cuttlebug using the A2 Stained Glass embossing folder.  I printed the inside of the card on my computer with Word, using the 2Peas Heart's Delight font in a matching pink colour.

The crown on the envelope is from the Sweet Treats Cricut cartridge.

Happy buggin'!

Monday, February 7, 2011

A birthday card I made from the Paper Doll Dress Up cartridge. The birthday party was held at our local Museum of Archaeology and I thought this was a fitting card for the birthday boy, turning 8. Total size of the card is 4 1/4" x 5 1/2".

The main clothing is Indian Boy <indnby> and <indnby-s>; Shoes and pouch (Accessories 1); Hair (Headwear); all from pg. 60. Feathers and headband are Indian Girl (Headwear); Teepee (Accessories 3); Cornstalks (Accessories 2); all from pg. 61. I used the cornstalks to accent the envelope and the inside of the card as well.

I printed the inside of the card in Word, using the Belfort font, and I glued on an extra cornstalk to tie it all in with the front of the card and the envelope.

**The number '8' is from Disney Mickey Font Cricut cartridge.

Happy buggin'!

Vinyl Application with Painter's Tape

No transfer tape for your vinyl??  No problem!!  All you need is painter's tape and your vinyl art.

Here are some step by step instructions for applying vinyl to a surface using painter's tape instead of the more traditional transfer tape.  Painter's tape is cheaper, yes, but mostly noticably it's easier to find.  Aside from ordering from my supplier, my only other source of transfer tape comes from Walmart or Michael's and they are usually out of stock or priced too high.  Painter's tape is readily available at Walmart or Zellers or any hardware or big box store and is my solution for around the house vinyl projects.  I've even seen it at the local dollar store in the hardware section.

I have already "weeded" the vinyl, which means getting rid of all the pieces of vinyl that are not part of your image.  It is also sometimes referred to as the "negative", and depending on your image and what you've intended it for, the negative can also be used.  The vinyl image in this photo has been weeded and is ready to be placed on the wall, or in this case, a bathroom cabinet.


Cover the image with painter's tape.  As you can see, you are still able to see the image through the tape.  White images are sometimes a bit tricky to see through the tape, depending on whether the manufacturer uses a blue background or white, but all other colours show through just fine.


Be sure to cover the entire image with your painter's tape, then burnish it really well.  Some people use a scraper, putty knife, etc.  I've been known to use a wallpaper seam roller, which works great, however, I recently discovered that a credit card or gift card works great as well, and fits easier in my little tool kit.  Be sure to rub it well and make sure there are no bubbles and that the vinyl is good and stuck to that tape.


Carefully peel the tape off the vinyl backing.  I find I have better success peeling the tape back on itself instead of up.  Go slow just in case the image doesn't quite stick to the tape.  If it doesn't...no biggie, just lay the tape back down and burnish it a little harder, and peel up again and continue on your way.


After you have the image on the tape and off the backing, you are ready to mount it on the wall, or in this case, on the cabinet.  The sticky side of the vinyl is now face-up in this photo.


Mount your image wherever you want.  You will be able to see the image through the tape, which makes placement much easier.  After you've stuck the image, burnish it again with your roller or card or whatever, making sure it's good and stuck and any air bubbles are smoothed out.


Peel the painter's tape off slowly.  Again, I find it better to peel it back onto itself instead of straight up.  And if there is some vinyl still stuck to the tape, just stick it back down, burnish some more and peel the tape again and carry on.


After the tape is off, I rub it again to make sure everything is stuck down well, and voila!

Incidentally, the process for applying vinyl using transfer tape is exactly the same. 

The heart-flourish image used in this project is from the Straight From the Nest Cricut cartridge.

Happy buggin'!

Sunday, February 6, 2011

May the Force be With You! Clone Trooper Birthday Invites.

With a houseful of boys, it was only a matter of time before they discovered Star Wars. I made these birthday invites for my son's 8th birthday.  I stumbled on the .svg file on Kristen's blog: Adventures of a Gluten-Free mom. (she's got LOTS of other awesome stuff too!!)  My intent was to create a Storm Trooper, apparently this is more of a Clone Trooper.  My son tells me that the crest on the mask is slightly different and is therefore now more of a Clone Trooper (?!?), but he's still pretty excited about them! I welded and cut the shape with SCAL on my Big Bugger (Expression).   I printed the invitation wording in Word, using the Star Jedi font. I played around with the spacing and sizing to fill the card. Sorry for the poor-quality photo of the inside of the card...it looked much clearer in real life.

Happy buggin'!