"Blessed are the children of scrapbookers, for they shall inherit the scrapbooks." ~Author Unknown

email us at lilbugger.ca@gmail.com


Sunday, March 27, 2011

Shroud on the Cross. SCAL Easter Card.

I stumbled on this image while searching for an Easter Lily image, and my immediate thought was that it would make an AWESOME Easter card to make with my Cricut machine(s)!
I used PhotoShop to alter the image a bit and separate the colours into shapes that I could work with.  Then I saved that as a new .jpg file.  I used Inkscape to convert the file into an .svg, which I then imported into my SCAL software to cut on my Big Bugger.
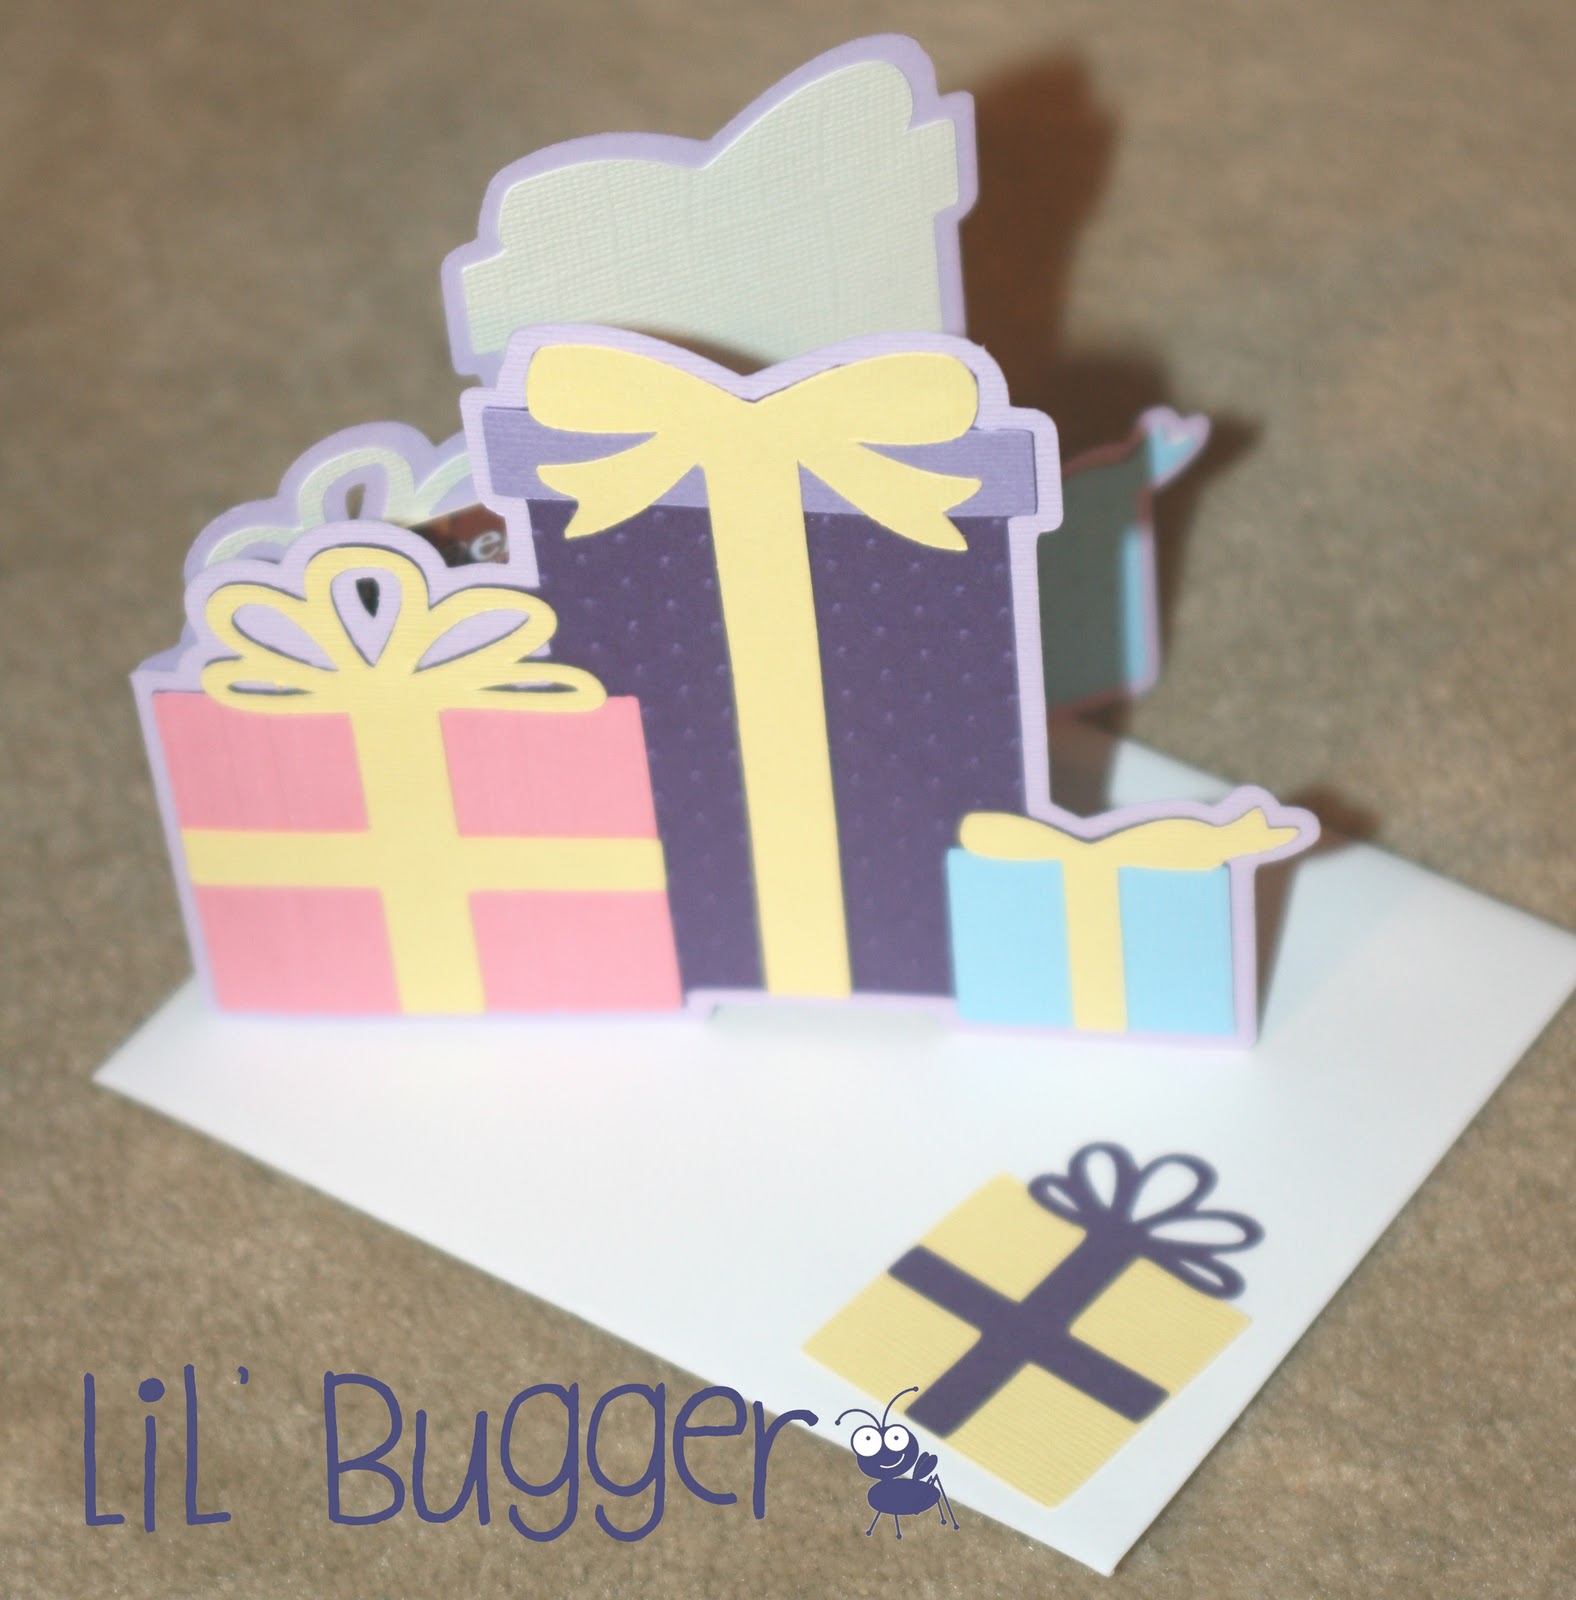
I cut the cross at 5", and because of the nature of SCAL, all other images adjust accordingly.  I embossed the lighter purple of the background using my Cuttlebug(ger) and the Scrollwork embossing folder, and matted it on a darker purple, then attached it to a robin's-egg blue card base.  The card base measures 8.5" x 5.5", which when folded in half is a standard A2 card, measuring 4.25" x 5.5".  I had to do a bit of fancy penmanship on the flower and the leaves, as with SCAL, it cuts the outline, not the inside details.  I'm pretty pleased with how it turned out.  I also used some grey chalking to give a bit of cloth-like detail to the shroud hanging on the cross.
I used some pop-dots to raise the lily up from the cross a bit, and then used a few more to raise the cross off the card.  It adds a bit more dimension.  I also used some Champagne Stickles for the stamen of the lily.  I wasn't sure how the lily would turn out, being so small, but was pleasantly surprised with how well it cut, and wish I had done the group of Lilies.
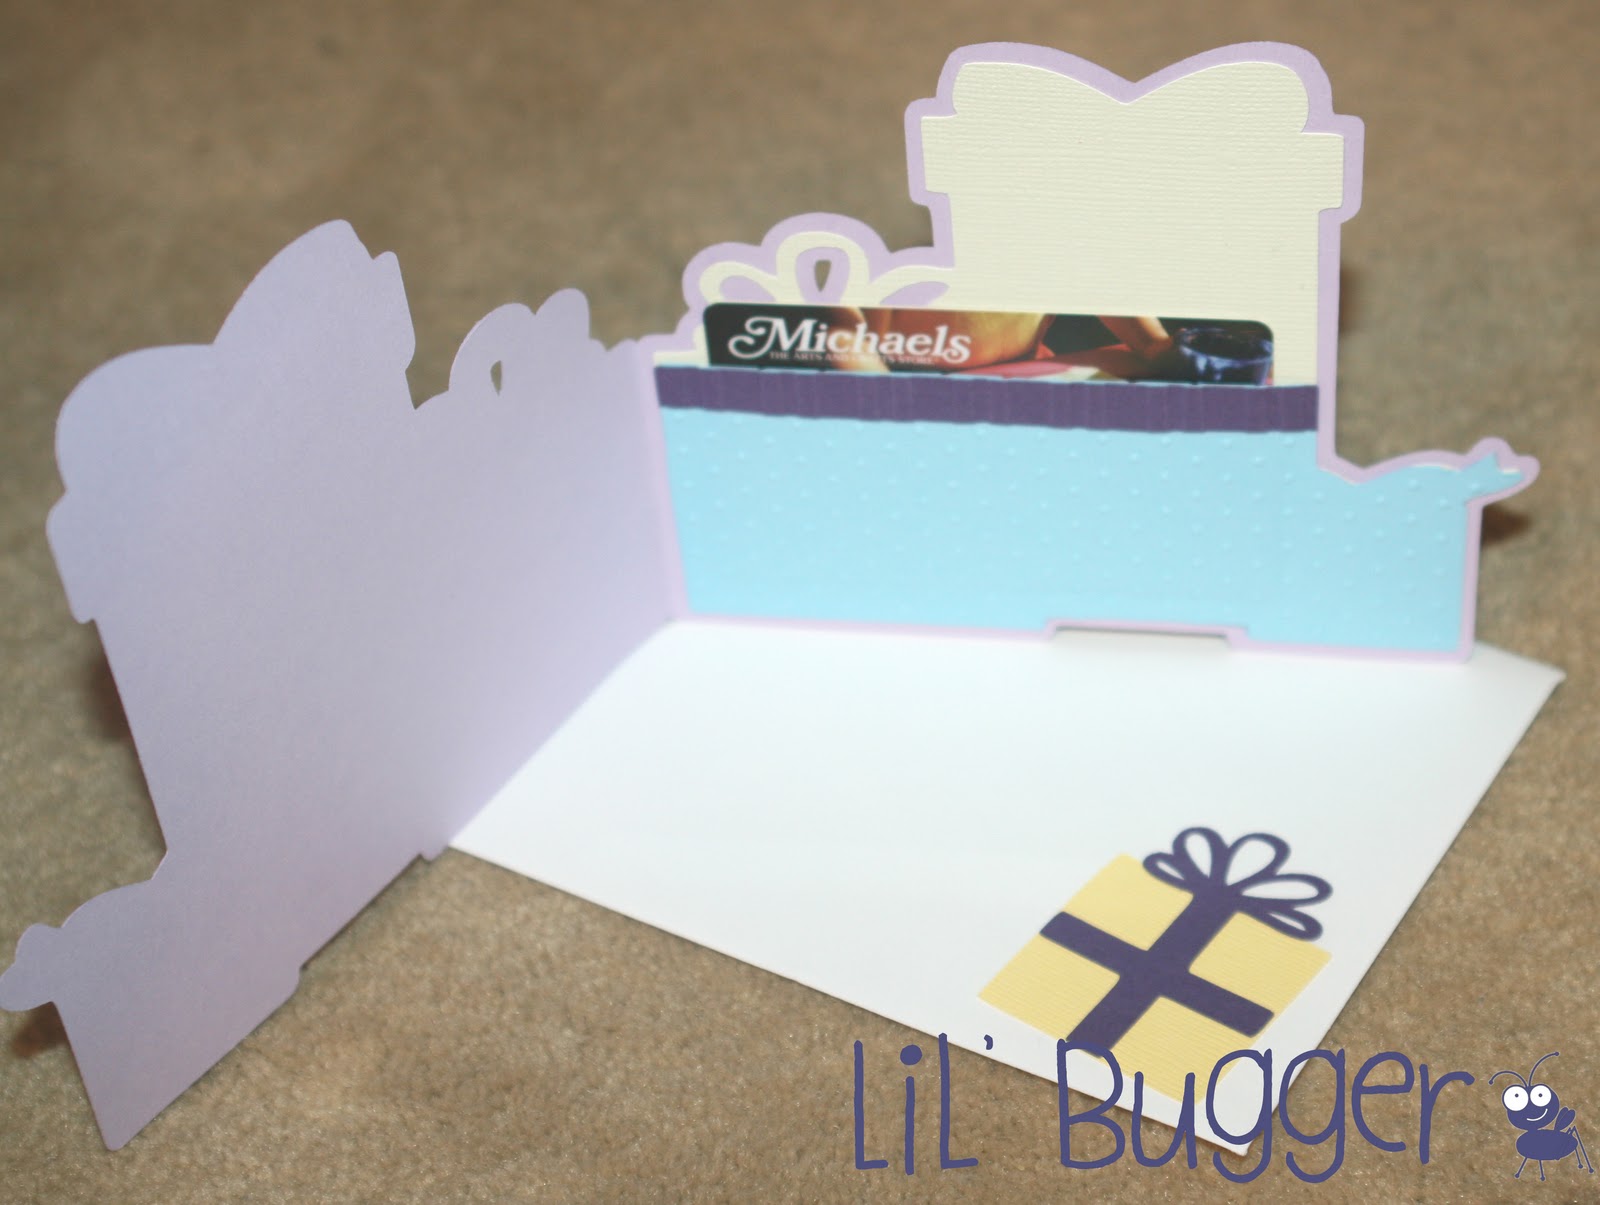
For the inside, and as a matching embellishment for the envelope, I used a yellow grossgrain ribbon, with a little bow.  I printed the inside on my computer, using Word and the Joe Hand 3 font.  The verse reads as follows:
Christ the Lord is risen today,
Sons of men and angels say.
Raise your joys and triumphs high;
Sing, ye heavens, and earth reply.
-Charles Wesley

I'm not sure yet how to share my .svg files or .scut (SCAL) files via the blog, but if you would like this or any of my other .svg or .scut files, email me and I'll gladly share them with you!

What are you crafting today?
Happy buggin'!


Cricut for the Classroom, My Son's Project

Things have been so busy in our house this week, and part of that has to do with some projects that my son had to complete for school.  I thought this would be a great time to show just how easy and fun the Cricut can be to use!  My son is 8 and found it offered the perfect images and cuts that he needed for his project.

I helped him with the title and his name for the cover.  They were created in SCAL.  The title is using the Goudy Stout font and his name was using the Brisk font.  This particular project was for his religion class.  Due to the religious nature of the assignment and the fact that it contains some of his personal thoughts, I have blurred out his writings.


On the cover, he used the Inspired Heart cartridge for Jesus on the Cross, and "love".  The sun is from Mickey and Friends, and the grass is from ZooBalloo.  I used the Bitty Bugger (Gypsy) to size it, join it, and weld it to cut wide enough to fit on the page.

The page numbers are from Learning Curve and the 'Daily News' newspapers come from Mickey and Friends.


All of the other inspirational images from pages 7-11 are from the Inspired Heart cartridge.  I just gave him my bucket of scraps and helped him position on the mat and away he went!

I think he did an awesome job! 


Happy buggin'!

Tuesday, March 22, 2011

Dino-Mite Get Well Soon card

A friend of my son's was going through a rough time medically.  All he talked about was dinosaurs.  My son wanted to create a dinosaur-themed card for him to take when we went to visit.  I helped him set up the machine initially, and did the printing of the inside sentiment in Word, but he picked the images, the colours, and what he wanted to say and what image he wanted to say it with.  This is his card:
All of the images on the front of the card are from the Dinosaur Tracks cartridge.  "Hope Your Recovery Is" was printed in Word onto cardstock using the Century Gothic font. We matted it and glued it to the card. DINO letters are from the Dinosaur Tracks cartridge, cut at 1.75".  "mite" is from the Opposites Attract cartridge, cut at 1/2" I believe. I used Cricut® DesignStudio™ to weld the letters together before cutting.
The Triceratops and the leaves on the tree are pop-dotted to add dimension.

Happy buggin'!

Sunday, March 20, 2011

Doodlecharms Shape Cards

I love love love my Doodlecharms cartridge!!  It's so cute and versatile and makes it so super easy to whip up little notecards and gifts for friends, children, teachers, and neighbours! 

Here are four quick little projects that I did...one note card for one of my daykids, two thank you cards for our bus drivers, a thank you card for a friend (who also happens to be a teacher) and a notecard gift set for a teacher.  All in all, everything was completed in under an hour!  Easy Peasy!

Popsicle Notecard:


I used my Bitty Bugger (Gypsy) to copy the popsicle shadow, flip it, and weld it to make the card shape card.  It was cut at 5.2", which is just the right size to fit into a standard A2 envelope.  I then cut the actual popsicle and base at the same size and assembled it.  The inside is just a base cut, but I used the Gypsy to 'hide' the accent shapes near the top, so it cut as one solid image.  The envelope of this card, addressed to Rachel, was cut using the Mini Monograms cartridge, and each letter and it's shadow was cut at 1".

Bus driver Thank You cards:
These adorable bus cards were also made with the Bitty Bugger (Gypsy) by copying, flipping, and welding the bus image.  The bus shadow and corresponding layers were cut at 3.75".  I used my computer and printer to print the name of the school in that white space on the side, using Word and the Catchup font.  You could easily put the name of a teacher, bus driver, student, etc., in that space.  Incidentally, this bus card flips up (not sideways).  I welded it at the roof of the bus.

Thank You card for a teacher friend:


I'm very happy with the simplicity and ease of this card, however, I still think it might need something.  Maybe some gel pen stitching or a ribbon or some sort of embellishment.  My teacher friend loved it though ;)  I used the scalloped circle from the Lacy Labels cartridge, cut at 3.5", and used my small hole punch to punch holes in each scallop.  I cut the apple shadow and corresponding layers at 2.5".  The inside sentiment is from the Walk in My Garden cartridge and is cut at 1.25" along with a shadow.

Teacher Notecards:


These are awesome for teacher gifts!  I do up 6 or 10 and bundle them up with a ribbon and give to teachers as a gift that they can use for thank you cards or notes to their students or parents.  I used my Bitty Bugger (Gypsy) and copied, flipped, and welded the apple shadow to make the card.  I then cut the corresponding layers, all at 4.25".  You could easily cut or print out a sentiment for the inside...but I find that giving them blank is better, as you never know what occasion they may use them for.  Guaranteed to love you for them, that's for sure!

Happy buggin'!


Thursday, March 17, 2011

Hello Thursday!

It's Hello Thursday!!  Seven new cartridges have been released!

  • Damask Decor
  • Elegant Edges
  • Everyday Pop-Up Cards
  • Father's Day
  • Happy Graduation
  • Luau
  • Pop-Up Neighborhood
Check out our blog page for all the cartridge details:
http://lilbuggerblog.blogspot.com/p/hello-thursday_17.html or you can click on the 'Hello Thursday' page link at the top of this page under our header.

Happy buggin'!


Wednesday, March 16, 2011

Happy Birthday, My Sister...My Friend.

My sister's birthday is coming up soon and I have to get this in the mail, like yesterday, if she's got any hope of getting it (and our presents) on time!  She recently dyed her hair purple, so there was no question as to the colour theme of her birthday card. 
Special thanks to Diana and her blog for her inspiration for this birthday card idea.  Everything is cut using the Celebrations cartridge that was sadly retired in January of this year.  The background is American Traditional Designs, scanned and printed onto white (Avalanche) Bazzill Basics paper.  Everything else is also Bazzill.  I cut the Happy and Birthday images at 2"; Shadow from light purple, blackout from ivory, and the standard cut from dark purple.  For the envelope, the party hat was cut at 1.5" with three layers - the standard cut, the blackout, and the shadow.  The ribbon and bling on the card are dollar store specials, lol.  I was SO tempted to raise the wording using pop dots, but some of the letters were so fine that I thought I might run into trouble hiding the dots.

I printed a sentiment on the inside using the CK Curly font, but felt it best not to share as it was somewhat personal. 

Happy Birthday, little sista!  *hugs*

Happy buggin'!

Sunday, March 13, 2011

Super Easy Thank You Card

It's been a crazy weekend around here, I didn't find any time to be creative today :( It all started with the time change, and just went downhill from there.  So for today, I decided to post an oldie but a goodie from days gone by, lol. This was actually one of my first ever cards. I originally posted it on my first blog, but ended up taking it down because I had no idea what I was doing and eventually gave up on blogging.

This simple and easy Thank You card was made with the Base Camp cartridge. It is a standard A2 card, measuring 4.25" x 5.5" and this one is simply black and white Bazzill Basics paper, but it could easily be made with any other colour combination and still be just as attractive.  I cut the shadow out of black and the base cut (words) out of white at 1 1/2″ on my Big Bugger (Expression). Then I ran a black and white ribbon through the holes and tied knots. I used a rubber stamp with black ink for the sentiment on the envelope. Easy-peasy. And as a bonus, I still have the white negative cuts of the word ‘thanks’ and the flowers which I can keep for a future project!

Happy buggin'!

Saturday, March 12, 2011

NFL Card & Gift - Manly Birthday

I was so happy with how my Chicago Bears card turned out for my hubby's birthday, that it didn't take much thought to figure that I should follow that theme and do a similar card for my brother-in-law, whose birthday follows just a few days later.  It's so hard to come up with a nice handmade card for the men in our lives...I'm just happy they like football, it sure saved me this year!

My brother-in-law is a huge Oakland Raiders fan.  (If you know him...shhhhhh, don't say anything, he won't be seeing this card until tomorrow.  I just couldn't wait to post it!)  This is his card:
The card is a standard A2, measuring 4.25" x 5.5". I cut a football using the Sports Mania cartridge to put on the envelope. Using my Bitty Bugger (Gypsy), I used the "hide" feature for the laces so they wouldn't cut. With the image being so small (I cut at 1.5"), the laces wouldn't cut clearly, so I hid them and used a white gel pen to draw them on by hand.


I cut the logo using my SCAL software.  I converted a .jpg that I found on the 'net and converted it into an .svg using Inkscape and then imported it into SCAL to cut.  The white stripe is a grossgrain ribbon and the paper is Bazzill Basics.  I printed the inside on my computer using Word and the Eric Lite Condensed and CK Sports Football font, and glued it inside the card.  The shield is pop-dotted to raise it slightly off the card.
This is a matching vinyl that I also cut as a gift.  It measures 6" x 6" and is for his car.  It is cut in two pieces, with the black positioned over the white.  Happy Birthday brother-in-law!

Happy buggin'!

Friday, March 11, 2011

Happy Birthday, Mr. Bugger!!

Today is my wonderful husband's birthday!!  I wanted to make him a card, but found myself once again flipping through cartridges trying to come up with something that wasn't too mushy or girly and couldn't find anything that worked for me this year.  Sigh.  Then my 8-year old suggests I try something sports-related and reminds me that he is a HUGE Chicago Bears fan.  The wheels start turning in my head, and this is what I came up with:
I'm SO pleased with how it turned out!!  I made this in two stages.  I used SCAL software to create the "Bear" in the middle and the "C" from .jpg images.  The "C" is glued right to the card base and the "Bear" is pop-dotted to give it a bit of dimension.  The card is a standard A2, measuring 4.25" x 5.5" (I really should try to do something in a different size, lol).  I cut a football using the Sports Mania cartridge to adorn the envelope.  Using my Bitty Bugger (Gypsy), I used the "hide" feature for the laces so they wouldn't cut.  With the image being so small (I cut at 1.5"), the laces wouldn't cut clearly, so I hid them and used a white gel pen to draw them on by hand.
I printed the inside on my computer, using Word and the CK Sports Football and Cobalt Extended fonts, and printed it on matching orange cardstock.  I mounted it on white cardstock, cut just slightly larger, and glued it to the inside.  Then of course, we all signed it.  :)
Horrible photo, I know, but I tried to show how the bear is slightly raised.

He loved it!  Sometimes it's just so hard to create cards for those men in our lives.  Happy birthday to the special man in my life! 

Happy buggin'!

Thursday, March 10, 2011

Gift Card Holder

I made this quick and easy Gift Card holder/card today, using the new 'Stork's Delivery' cartridge from Creative Memories.  It is cut to fit a standard A2 envelope (4.25" x 5.5").  I tried to keep some "Easter-ness" with it and use some pinks, purples and blues, and this is what I came up with:
It is a shape card, base image cut at 4", which makes the shadow approximately 4.25", which is the perfect size to fit the card in the envelope.  I embossed the dark purple with my Cuttlebug, using the Swiss Dots folder, and the pink is embossed with the Pyjama Stripes folder, which you can't see very well in this photo, sorry.  I cut a second little 'gift' at 1.5" for embellishing the envelope to match.


I cut 2 more of the base image, one in blue and one in ivory for the inside.  I cut the blue one in half width-wise and glued it to the ivory one, with enough space to hold a gift card, and glued it to the inside of the card.

Happy buggin'!

Wednesday, March 9, 2011

Wall-E Birthday Party

My son ABSOLUTELY had to have a Wall-E themed birthday party this year. In my hunt for invitation ideas, this is what I came up with.
I took a Wall-E colouring page from the internet and saved it as a .jpg file:
I then converted it to an .svg file using Inkscape and cut it on my Big Bugger (Expression) using Sure Cuts A Lot software. I drew the details on the grey "neck" piece with a black gel pen.  I punched the stars with a little Fiskars Country Star punch, and decorated the envelope to match.


The inside of the card was created on my computer, using Word and the Pop Star font. 

I know it's not made with the Cricut or the Cricut cake, but I also made the matching Wall-E cake.  I used a standard Wilton Wall-E cake pan that I rented from our local Bulk store.

The party was a hit!  Sure Cuts A Lot, a colouring page, and a little imagination and I have one very happy almost-five year old! :)

Happy buggin'!

Monday, March 7, 2011

Clothespin Magnets

These cool little things are clothespins, belive it or not!  What a great idea for a year-end teacher gift or for Mother's Day to help mom keep her family organized, or maybe dad can use them at the office or on his toolbox at work. 
I painted regular clothespins in coordinating colours to my cardstock.  I cut the days of the week, one in each colour to match the clothespins, from the Designer's calendar cartridge, at .75" which made them approximately 2.75" long.  Everything was then spray-varnished for added durability, and I finished it off by gluing magnet sheets onto the back.

Happy buggin'!